3 Benefits Of Tree Pose – Best Yoga pose (Vrikshasana)

3 Benefits Of Tree Pose – Best Yoga pose (Vrikshasana)

3 Benefits Of Tree Pose – Best Yoga pose (Vrikshasana)

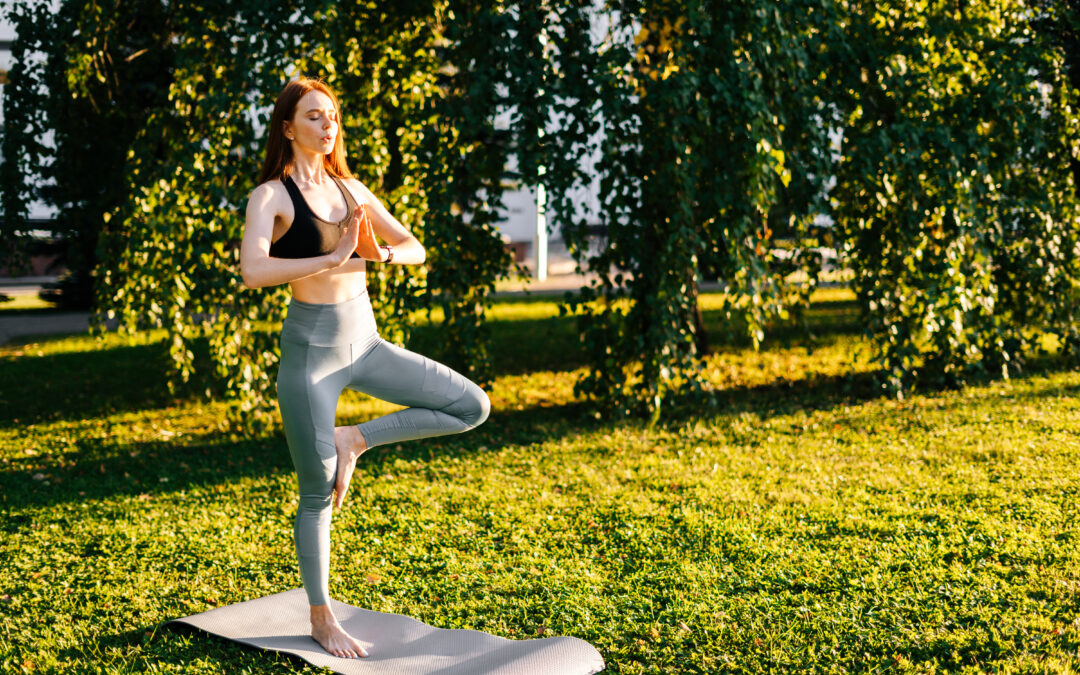
Tree Pose is the best pose that strengthens the leg improves balance and fixation while quieting your brain. Its Sanskrit name, “Vrksasana” (vrik-SHAH-Suh-nuh), originates from two words:

“Vrksa,” which signifies “tree”

“Asana,” which signifies “present”

Tree Pose (Vrksansana) is generally the primary standing parity represent that is instructed to yoga tenderfoots since it’s the least complex. Keep your comical inclination about figuring out how to remain on one leg. It’s harder than it takes a gander from the outset and will be distinctive consistently. Try not to get disappointed in the event that you wobble or even fall over from the start.

Benefits of Tree pose (Vrikshasana)

  • It stretches the legs, thighs, spine, shoulders, and arms, and strengthens you.
  • It makes the legs strong, improves balance, and opens the hips.
  • Best pose for posture-related complaints.

How to do Tree pose (Vrikshasana)

  • Begin by standing upright in Samasthithi, your arms by your side and shoulders relaxed.
  • Bend your right knee to the side and bring your right foot high up to your left thigh.
  • Place the sole of your right foot flat and firm on your inner left thigh. Keep your left leg straight with the foot firmly planted on the ground.
  • Raise both your arms over your head and join your palms in the ‘namaskara’ position.
  • Keep the spine straight.
  • Repeat the above steps with the other leg.

Tips of Tree pose (Vrikshasana)

  • Rather than speed, focus on height of jump.
  • Stretch as much as you can like basket ball throw.

Video

Warnings of Tree pose (Vrikshasana)

  • Avoid putting your foot on your inner knee if you have any knee pain, knee injuries or knee ligament injuries, or knee arthritis. Instead, keep your foot on your calf or inner thigh.
  • Avoid if you have high blood pressure or vertigo, migraine, or insomnia.
Garland pose (Malasana)

Garland pose (Malasana)

Benefits

  • Stretches the ankles, groins and back torso
  • It tones the belly.
  • Instigates metabolism.
  • Increases flexibility in your ankles and knees.

Tips

  • If twisting is difficult, sit on the front edge of a chair seat, thighs forming a right angle to your torso, heels on the floor slightly ahead of your knees. Lean your torso forward between the thighs.

How to do

  • Begin by squatting. As you do this, keep your feet close to each other, with your heels on the floor or supported on the ground.
  • Spread out your thighs, placing them slightly wider than your torso.
  • Exhale and lean forward such that your torso fits snugly in between your thighs.
  • Bring your palms in the Anjali Mudra (prayer position), and press your elbows against the inner thighs. Doing this will help you extend the front part of your torso.
  • Press the inner thighs against the side of the torso. Then, stretch your arms out, and swing them across such that your shins fit into the armpits. Hold your ankles.
  • Hold the pose for a few seconds. Inhale and release.

Video

Warning

  • Do not practice this pose if you have a recent or chronic low back or knee injury. Always work within your own range of limits and abilities.
  • If during this asana you have any kind of leg cramps or you have pain in your knees, then you should immediately leave that posture, do not forcefully try to do this asana.
Upward Plank Pose (Purvottanasana)

Upward Plank Pose (Purvottanasana)

Benefits

  • Reduces cramps at the calf, hamstrings and quadriceps
  • Improves the functioning of the thyroid gland
  • Stretches the shoulders, chest, and front ankles
  • Strengthens the arms, core, legs and back.

Tips

  • Exercise with a chair support: Sit near the front edge of the seat and wrap your hands around the back edge. Inhale to lift your pelvis, then extend each leg with an inhale.
  • Keep your neck long. If you feel any density in your neck, tuck your chin slightly and do not let your head drop all the way back.
  • Be seated with your legs outstretched in front of you in Dandasana.
  • Place your hands a little behind your hips with the fingers directing towards the toes, point your toes.
  • Roll your inner thighs in, draw your belly in and up, and as you inhale, lift your hips up as high as you can, keeping your jaw to your chest.
  • Firm your shoulder edges on your back to help lift your chest up.
  • When your chest is lifted you may choose to bring your head back.
  • Keep your chin tucked when you bring your head back, to the point where you can’t keep it tucked anymore. Then gently release your head.
  • Otherwise, if this feels too much for your neck, keep your head up and your chin towards your chest.
  • Stay here for about 5 breaths, then as you exhale, lower your hips back down into Dandasana

How to do

  • Be seated with your legs outstretched in front of you in Dandasana.
  • Place your hands a little behind your hips with the fingers directing towards the toes, point your toes.
  • Roll your inner thighs in, draw your belly in and up, and as you inhale, lift your hips up as high as you can, keeping your jaw to your chest.
  • Firm your shoulder edges on your back to help lift your chest up.
  • When your chest is lifted you may choose to bring your head back.
  • Keep your chin tucked when you bring your head back, to the point where you can’t keep it tucked anymore. Then gently release your head.
  • Otherwise, if this feels too much for your neck, keep your head up and your chin towards your chest.
  • Stay here for about 5 breaths, then as you exhale, lower your hips back down into Dandasana.

Video

Warning

  • Do not practice this asana, if you have carpal tunnel syndrome, a shoulder injury, or wrist injury.
  • If during this asana you have any kind of leg cramps or you have pain in your knees, then you should immediately leave that posture, do not forcefully try to do this asana.
Seated Wide Angle Pose (Upavistha Konasana) Yoga Pose

Seated Wide Angle Pose (Upavistha Konasana) Yoga Pose

Benefits

  • It Stimulates the abdominal organs
  • Strengthens and tones the abs, spine and legs.
  • Helps to cure and relieve sciatica and arthritis.
  • It detoxifies the kidneys.

Tips

  • This pose is quite challenging for beginners. If you find it hard to bend forward, you could bend your knees gently. You could even use blankets to support your knees. You must move forward in the bend, and ensure your knee caps point upwards throughout the asana.

How to do 

  • From Dandasana, bring your legs wide apart, up to a point where you feel a good stretch, but can still hold the pose, maintaining a straight spine, and without falling back.
  • Flex your feet, and keep your knees and toes pointed up towards the ceiling. Press your legs and sitting bones down, and extend through your spine.
  • With a long spine, bend from the hips. Place your hands between your legs on the floor, and slowly exhale as you start to walk your hands forwards.
  • Maintain length along the front of your body as you come further into the forward bend. If you feel you are starting to arch your back, don’t lower any further.
  • Hold this pose for 5 to 10 breaths.
  • To come out of the pose, come up with a straight back, pressing your sitting bones down, as you exhale.
Side Plank Pose (Vasisthasana)

Side Plank Pose (Vasisthasana)

Benefits

  • Strengthens hands, wrists, arms, core, and legs
  • It stretches the backs of the legs.
  • Improves sense of balance and focus

Tips

  • To learn the correct weight distribution in the pose, exercise it with the soles of your feet pressing against a wall.

How to do 

  • Start in Plank Pose, pressing firmly through your hands with your shoulders aligned over your wrists.
  • Keeping your core muscles and legs engaged, roll both your heels to the right.
  • Stack your left foot on top of the right.
  • Draw your legs together and push out through the feet.
  • Press down through the right hand and raise your left hand. Keep your lower belly engaged and your tailbone long.
  • Look up to your hand, or ahead of you.
  • Build up to stay in the pose for 5 breaths.
  • To come out, exhale as you lower your left hand and reel your feet back to Plank position.
  • Repeat on the other side.
Shanmukhi mudra

Shanmukhi mudra

Benefits

  • Great for facial muscles and appearance as the heat and prana of the hands and fingers stimulates and relaxes facial muscles.
  • Useful for managing anxiety and removing negative intellectual patterns.
  • It stimulates sensory organs and later stages sense withdrawal.
  • Brings about focus, introversion and calmness,

Tips

  • Place the fingers gently on the face.

How to do

  • Be seated straight but relaxed.
  • Place the little fingers below lips, ring fingers above lips, middle fingers at the nostrils, index fingers on the eyes, and thumbs at the openings of the ears.
  • With middle fingers softly resting on the nostrils (without closing them partially), breathe deeply and with each breath take the awareness more and more inward with this feeling that you are not interested in anything outer.
  • After each inhalation you may hold the breath in, and gently close both nostrils with middle fingers. Hold it for few seconds but without any scuffle, and then exhale smoothly.
  • On exhalations you can also make a long high-pitch sound like a bee.
  • In the beginning, practice this for 8-10 breaths, and gradually increase it to 5-8 minutes.

Warning

  • Avoid this pose if you felt any discomfort performing this exercise.
  • For some people it can bring up strong emotions very fast and sometimes fear.